Getting started - Stage 1 of 4
‘Getting Started’ skills include: body awareness, shared attention (looking at the same thing together), visual attention (focusing on something), shoulder stability, hand eye coordination, visual tracking activities (looking and following something with your eyes), motivation to engage, variety of grasps and grasp strength.
Next Steps - Stage 2 of 4
Use fastening toys and boards to practice the skill of fastening/threading with pincer grasps. Complete threading games and activities. Complete games to support the development of visual motor integration. Complete these activities at times of the day where the child/yourself are not rushing.
Getting there - Stage 3 of 4 and shoe tying methods:
- Choose a shoe tying method.
- Start practicing with a shoe whilst it is not on the foot.
- Practice using two different coloured laces. This helps to provide visual cues and so may be helpful for children who mix up their left and right.
- Use thicker laces as these may be easier to hold.
- Use simple terms to explain steps one at a time.
- Practice sitting behind the child so that your hands are positioned the same as the child’s.
- Try chaining methods:
- Backwards chaining - Complete the whole tying shoes process and let the child complete the final steps.
- Forward chaining - Have the child complete the first step and you complete the rest.
- Once the child is able to complete the first/last step ask them to complete the next step in the sequence.
‘Bunny Ear’ Technique:
Making the first knot:
- Take hold of the laces, one in each hand, then cross the laces over.
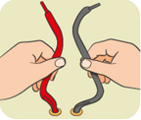
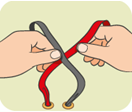
- Where the laces have crossed, hold them in one hand and pass the upper lace under the lower lace and through the hole, in a toe to heel direction.
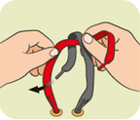
- Grasp the end of each lace and pull to the sides to tighten.
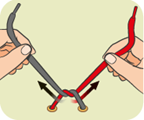
Making the bow:
- Make a loop with one of the laces - Make sure some of the lace is kept out of the loop.
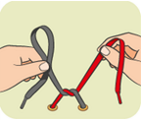
- Make a second loop with the other lace

- Cross the 2 loops over keeping hold of the loops at all times.
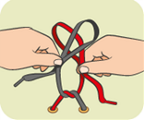
- Hold the loops in one hand keeping this hand still for the rest of the procedure. With the other hand, post the loop through as you did when tying the knot.
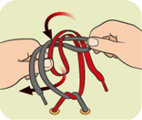
- Pull the end of the loops to make the lace tight.
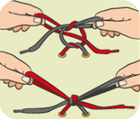
Above pictures taken from: http://raisingchildren.net.au/articles/pip_shoelaces.html/context/358
Feeling Confident - Stage 4 of 4
Your child should be in a supported sitting position on the floor, to support their balance. It may be helpful to sit with their back against a wall or piece of furniture.
Your child should now put their shoe on to complete this stage. Once they are able to tie the shoelace, focus on tying the shoelace tightly and learning to double knot to support the shoelace remaining in position.